Roof Access Ladder Installation Manual
Exclusive for the 1979 to 2018 Mercedes-Benz Geländewagen W460, W461 and W463, with a single rear cargo door.
This manual is for the following ladder versions:
1) VTS-7110 W460/461 Models
2) VTS-7111 W463 Models to 2008
3) VTS-7112 W463 Models G-550, G63 from 2009 - 2018
1.) VTS-7110 for the W460 and W461 from 1979 on:
Note: You have received a ladder box labelled VTS-7111, inside you will find the ladder and two additional hardware boxes. Please open the first hardware box VTS-8410, remove and discard the included Frame Bracket (VTS-7108), and use the other frame bracket VTS-7107 from the second hardware box. Please check for the provided needed hardware items:
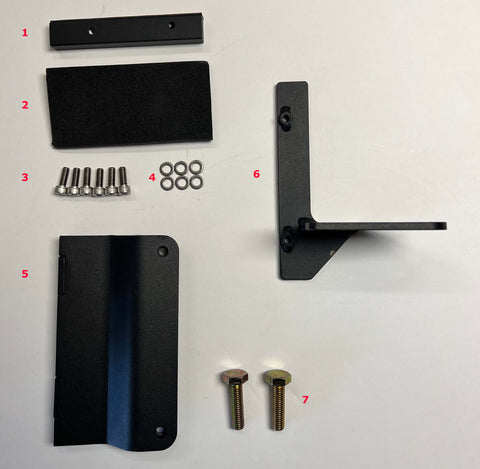
1 Locking Bar for the top ladder mount
2 Foam pad
3 M6 x 1.0 x 20 SS Allen Head Screw (Qyt. 6)
4 M6 SS Washer (Qty. 6)
5 Mounting Plate
6 VTS-7107 Frame Bracket
7 M10 x 1.5 x 30 Hex Head Bolts (Qty. 2), replacement for the existing ones
- Remove the two existing M-10 hex bolts on the right outside bumper bracket.

- Install the new VTS-7107 Frame Bracket using the included longer M-10 x 30 mm hex bolts. With the two threaded M-6 holes facing the rear, position the bracket into the gap between body and the top of the rear bumper.
- The frame bracket with its two threaded M6-holes in the rear bar, must be levelled horizontally above the bumper, use washers/spacers as needed to achieve that.
- Only finger tighten those new bolts, do not use a wrench, as the bracket still needs to move, for any adjustments later - if needed.
- Now remove the right rear tail light lens.
- Insert the Ladder Mounting Plate as shown between the body/bumper gap, and fasten it to the previously installed Frame Bracket using the M-6 x 20mm Allen cap screws & washers. Again, just finger tighten until the ladder is in place and top of ladder has been tightened.
- If the existing gap between the body and bumper is too tight, readjustment of the rear bumper will be necessary
- Make sure that the installed new Mounting Plate is level (parallel to the bumper)
Please note: Some older images still depict the older
Mounting Plate version (round stand-offs), which are
now replaced by a re-designed formed plate.
Frame Bracket VTS-7107 mounting position with new Plate, W460 & W461
For G-Wagon Roof Access Ladder VTS-7110


2.) VTS-7111 for the W463 from 1990 up to 2008:
Remove the VTS-7111 Roof Access Ladder from the packaging with the provided hardware pack (VTS-8410) and check for the items below:

1 Locking Bar for the top ladder mount
2 Foam Pad
3 M6 x 1.0 x 20 SS Allen Head Screw (Qty. 6)
4 M6 SS Washer (Qty. 6)
5 Mounting Plate
6 VTS-7108 Frame Bracket
7 M10 x 1.5 x 30 Hex Head Bolts (Qty. 2), replacement for existing ones
Installation of the Frame Mounting Bracket VTS-7108 for W463 up to 2008
- Remove the two existing M-10 hex bolts on the right outside bumper bracket.

- Install the new VTS-7108 Frame Bracket using the included longer M-10 x 30 mm hex bolts. With the two threaded M-6 holes facing the rear, position the bracket into the gap between body and the top of the rear bumper.
- The frame bracket with its two threaded M6-holes in the rear bar, must be levelled horizontally above the bumper, use washers/spacers as needed to achieve that.
- Only finger tighten those new bolts, do not use a wrench, as the bracket still needs to move, for any adjustments later - if needed.
- Now remove the right rear tail light lens.
- Insert the Ladder Mounting Plate as shown between the body/bumper gap, and fasten it to the previously installed Frame Bracket using the M-6 x 20mm Allen cap screws & washers. Again, just finger tighten until the ladder is in place and top of ladder has been tightened.
- If the existing gap between the body and bumper is too tight, readjustment of the rear bumper will be necessary
- Make sure that the installed new Mounting Plate is level (parallel to the bumper)
Please note: Some older images still depict the older Mounting Plate version (round stand-offs), which are now replaced by a re-designed formed plate.
Frame Bracket VTS-7108 mounting position with Plate, W463 up to 2008
For G-Wagon Roof Access Ladder VTS-7111


3.) VTS-7112 for the W463 from 2008 until 2018:
Note: You have received a ladder box labelled VTS-7111, inside you will find the ladder and two additional hardware boxes. Please open the first hardware box VTS-8410, remove and discard the included Frame Bracket (VTS-7108), and use the other frame bracket set VTS-7113 from the second hardware box. Please check for the provided needed hardware items:

1 Locking Bar for the top ladder mount
2 Foam pad
3 M6 x 1.0 x 20 SS Allen Head Screw (Qty. 6)
4 M6 SS Washer (Qty. 6)
5 Mounting Plate
6 VTS-7113 Outer Left Bumper Bracket (Replacement)
7 VTS-7113 Lower Mounting Bracket
8 M10 x 1.25 x 25 Hex Bolt (QTY. 2)
9 M10 Washer (Qty. 2)
10 M10 x 1.5 x 30 Hex Head Bolts (Qty. 2), replacement for existing ones
Installation of the Frame Mounting Bracket VTS-7113 for W463 from 2008 to 2018
- Due to the large OEM fuel tank protection plate found on the 2008 to 2018 G-Class (G550 & G63), the mounting space for our standard lower mounting bracket has been mostly taken up by the new OEM protection plate.
- Unplug the cable from the far right back-up sensor.
- Remove the existing right hand outer bumper bracket completely from the vehicle.
- Insert the new supplied bumper bracket and fasten it lightly to the bumper and frame, using the existing hardware.
- Re-route the harness again through large hole in the bracket and plug it back into the sensor.
- Install the t-shaped mounting bracket using the M10 x 25mm bolts and washer to the new bumper bracket. Do not tighten it completely.
- Only finger tighten those new bolts, do not use a wrench, as the brackets still needs to move, for any adjustments later - if needed.
- Now remove the right rear tail light lens.
- Insert the Ladder Mounting Plate as shown between the body/bumper gap, and fasten it to the previously installed Frame Bracket Bar using the M-6 x 20mm Allen cap screws & washers. Again, just finger tighten until the ladder is in place and top of ladder has been tightened.
- If the existing gap between the body and bumper is too tight, readjustment of the rear bumper will be necessary
- Make sure that the installed new Mounting Plate is level (parallel to the bumper)
Please note: Some older images still depict the older Mounting Plate version (round stand-offs), which are now replaced by a re-designed formed plate.
Frame Bracket Set VTS-7113 mounting location with Plate, W463 2008 to 2018
For G-Wagon Roof Access Ladder VTS-7112


Roof Access Ladder Installation
Fold the included Foam Pad into a “S” shape and insert into the ladder’s upper mount as shown.

- Carefully slip the top of the ladder onto the rain gutter making sure the protective pad is still in place to cushion the ladder against the gutter and vehicle paint finish. This must be done at the same time as the bottom of the ladder positions on the M-6 spacer of the Ladder Mounting Plate.
- Position the left side of the ladder approximately one inch from the door gap as shown.

- Sight the ladder’s vertical position and adjust it carefully parallel to the rear door frame / gap.

- Adjust the clearance between the tail light lens, Ladder Bracket and the rear door as needed.
- Carefully check for correct rear door open & close operations.
- Remove protective adhesive film from Locking Bar and with the narrower side of the bar to the right (rain gutter slopes down to the right) line up the mounting holes with the upper ladder mount and push it up against the under side of the rain gutter as shown.

- IMPORTANT: Using a small wooden block and a clamp, gently clamp the Locking Bar against the gutter applying enough pressure to align the holes to securely mount the top of the ladder.
NOTE: If the optional light kit was purchased, install its bracket now.

- Insert the two button head screws and washers and tighten them down securely. Do not over tighten, as the Locking Bar is threaded aluminum.
- Install the two M-6 Allen cap screws and washers through the Tail Light Frame into the mounting plate.

- Re-install the tail light lens.
- After verifying the correct clearance to the rear door and tail light lens, tighten all M‐10 hex bolts on Frame Bracket and the four M‐6 Allen cap screws on Ladder Bracket and Mounting Plate securely.

For installation questions please contact: gwagenaccessories@gmail.com